Thursday, November 22, 2012

GAC deployment but code does not update

Recently i faced a strange issue and i want to share that with you guys, when deploying the application pages and dll in to GAC. The issue was when i change the html and code and deploy to my sever it was working fine but when i installed the same solution on production environment only the html was showing updates but not the code .i.e changes made to the code files were not reflecting on the production environment. I used the gac utility to uninstall and install but no effect on the code, i was shocked with this strange issue html is reflecting changes but not the code.

I googled this issue but not worked for me. Then in one of the post i read that check the dll version and time of installion, then first thing i did is change the dll version from the project properties. Right click on the project, select Assembly Information and then changed the dll and file version, then build the wsp file and installed on the production server. Yes this time it did the trick code changes were reflecting on the application pages on the production site. The only problem was change the dll version and make sure that in the gac it has latest version installed.


Monday, October 15, 2012

Connected Web Parts

SharePoint Object Model provides the functionality where web parts can communicate with each others by sending and getting parameters and this mechanism is called Connected Web Parts. You can create connections between web parts and send/receive information between them.

In this post i am going to explain how you can make connection between web parts pro-grammatically.

The connected web parts is based on the concept of interface.

First of all creates a interface and a property whose value can be send to other web parts. In my case i have created a property to send client info to other web part 

  public interface ClientInterface
    {
        string clientinfo { get; }

    }
Now create a web part from say "SenderSenderWebPart " where you want to send the value to other web part and inherit above interface like

 public class SenderWebPart : WebPart,ClientInterface
    
Now create a property to send the value in this web part

 public string clientinfo
        {

            get
            {
                return "Your Test Value";
            }
        }

and create a connection attribute like below:

[ConnectionProvider("clientinfoprovider")]
        public ClientInterface getclientname()
        {
            return this;
        }

Now create another web part say "Receiver" that will receive this clientinfo from above web part

Create a object of interface in this new web part like   ClientInterface clientinfostring;

Create a connection consumer attribute like 

[ConnectionConsumer("clientinforRightNavigationWebpart", "GetClientInfo")]
        public void ReceiveClientInfo(ClientInterface c)
        {
            clientinfostring = c;
        }

Now you can get the clientinfo in this web part. 

For example 

 protected override void RenderContents(HtmlTextWriter writer)
        {

      
            if (clientinfostring != null)
            {

                 string clientname= clientinfostring.clientinfo;
              
                writer.Write(clientname);
            }

Now build and deploy the web parts. When you place these web parts on page, select edit page, edit sender web part, select connection and make connection to the receiver web part as shown below


Once you create a connection it ask for the confirmation. Now your web parts are connected and can communicate with each other.

Friday, July 20, 2012

InfoPath Form Publishing Error

When you publish  InfoPath  form to the library, then there are chances that you get this error message

"An issue was found with the following variable 'Form.FormCode_variable'. Member variables are not supported. Use the FormState property to store data"

The main cause of this error is that somewhere in the code of form you have declared a variables and you are accessing that variables.

e.g. public string clientname="c1";

and you are using this "clientname" variable through out the form.

To avoid this use property like

public string clientname
{
get;set;
}

and use the FormState property of  InfoPath  form to use this value through out the form.

FormState property is state management technique in InfoPath forms and can be accessed in the form.

Use FormState["client"]=clientname;

and to access this use string clientname=Convert.ToString(FormState["client"]);

With the help of FormState the form will be published without any errors.

Friday, July 13, 2012

SharePoint Rich Text Input Control

SharePoint 2010 has inbuilt text box control that can be used to create rich text strings including images, hyperlinks, can use your own html tags in this.


Let's see how to use this control

The control tag is defined below

 <SharePoint:InputFormTextBox ID="txtmsg" runat="server" Rows="10" TextMode="MultiLine"
                RichText="true" RichTextMode="FullHtml">

There are properties that turns this simple text box to rich text box control and those are "RichTextMode" and "RichText"

Set "RichText" property value to true to and "RichTextMode" to "FullHtml". You can set height and width of this control using the "Columns" and "Rows" properties respectively.

Known Issues

This control does not work with firefox and chrome browsers. Only works with IE.

Sometimes this control does not render properly and only html text is displayed, to overcome this issue use the below function on the html part of page where you are using this control.


This function converts the text area to rich text control using function"RTE_ConvertTextAreaToRichEdit"

that is defined in the "/_layouts/1033/form.js" file.


<script type="text/javascript">

function CreateRichEdit(id) {

if (browseris.ie5up && browseris.win32 && !IsAccessibilityFeatureEnabled()) {

g_aToolBarButtons = null;

g_fRTEFirstTimeGenerateCalled = true;

RTE_ConvertTextAreaToRichEdit(id, true, true, "", "1033", null, null, null, null, null, "Compatible", "\u002f", null, null, null, null);

RTE_TextAreaWindow_OnLoad(id);

}

else {

document.write("&nbsp;<br><SPAN class=ms-formdescription><a href='javascript:HelpWindowKey(\"nsrichtext\")'>Click for help about adding basic HTML formatting.</a></SPAN>&nbsp;<br>");

};

}

    var id = "<%= txtmsg.ClientID %>";


"here use your own rich text control id and call the function like below;

    CreateRichEdit(id);
</script>

Tuesday, June 26, 2012

How to create SharePoint User Group and Assign Permissions


There are some cases where you want to create a group pro grammatically and want to assign permission. e.g. on the Feature receiver (Feature Activated) code.

In this post i am going to explain you how to create group and to assign permissions to this group.
First get the collection of site groups.

SPGroupCollection groups = web.SiteGroups;

web.BreakRoleInheritance(false);
Add the group to this collection. I have created "Test Group" in this example.

groups.Add("Test Group", web.CurrentUser, null, "");
SPGroup grp= web.SiteGroups["Test Group"];          

AllowMembersViewMembership property of this group to false.

This  Gets or sets a Boolean value that specifies whether only group members are    allowed to view the list of members in the group.
grp .OnlyAllowMembersViewMembership = false;
        grp .Update();

Now create a Role Assignment object of this group.

SPRoleAssignment asgn = new SPRoleAssignment(web.SiteGroups[ "Test Group"]);

Create a Role Definition, Here i have used the "Administrator" role, other available roles are

1) None
2) Guest
3) Reader
4) Contributor
5) WebDesigner
6) Administrator  

            SPRoleDefinition role = web.RoleDefinitions.GetByType(SPRoleType.Administrator);

Now assign the Role to the Role Assignment and add the  Role Assignment to the web and update the web

            asgn.RoleDefinitionBindings.Add(role);
            web.RoleAssignments.Add(asgn);
            web.Update();

Now deploy the solution and check the group and its permissions.

I have used this code on the feature activated code that creates group and assign permissions to this.

Tuesday, June 19, 2012

Create SharePoint Lookup Field Programmatically


Lets see how to create a lookup field in a list programmatically

Lets you have a list named "Expense" and another list "Expense Category"

In the "Expense" list you want a lookup field from "Expense Category" list on "Expense Category" field

First add a lookup field named "Category" in the "Expense" list as

   SPList Expense = web.Lists.TryGetList("Expense");
   SPList ExpenseCategory = web.Lists.TryGetList("Expense Category");

   SPFieldCollection _fields = Expense.Fields;

   _fields.AddLookup("Category", ExpenseCategory.ID, true);

In above code i get the collection of fields from the "Expense" list and added a lookup field named "Category" and passed the

GUID of "Expense Category" list from lookup is to be set and set required to true.

Now get the recently created lookup field as

   SPFieldLookup Category = Expense.Fields["Category"] as SPFieldLookup;

Set the lookup field from the "Expense Category" list, Field "Expense Category" and update the field

   Category.LookupField = ExpenseCategory.Fields["Expense Category"].InternalName;


   Category.Update();


deploy the solution and verify the lookup field created in the list

Friday, June 15, 2012

Programmaticlly Create Choice Field with Default Value in SharePoint


In this post i am explaining how to create a choice field in the list and set its default value pro-grammatically

First create a string collection of choice values that you want to use

  StringCollection _statusTypes = new StringCollection();
            _statusTypes.Add("Complete");
            _statusTypes.Add("Incomplete");

Get the field collection from the list and add new choice field to this


 SPList list = web.Lists[listname];
            SPFieldCollection _fields = list.Fields;


  _fields.Add("MyChoiceField", SPFieldType.Choice, true, false, _statusTypes);

Here "MyChoiceField" is the name of field with _statusTypes choice values.

Next to set the default value of the choice field use the code below

Get the choice field
        SPFieldChoice fieldChoice = (SPFieldChoice)list.Fields["MyChoiceField"];
Set its default value              
      fieldChoice.DefaultValue = "Incomplete";
Set the format dropdown or radio button            
      fieldChoice.EditFormat = SPChoiceFormatType.RadioButtons;
and update the field
      fieldChoice.Update();
Now deploy the solution and add new item in the list you will see the default value set for this choice field

Sunday, May 27, 2012

Run Workflow from Hyperlink in SharePoint List

There is an  easy way for the users to start a workflow from the link instaed of selecting from item menu and then select the workflow from the available workflows and then start workflow from the workflow start form.

In this example i am going to update the list item with the workflow that is triggred from the hyprtlink in the SharePoint list


1) First create a workflow to update any list item in the SharePoint site List.
In the workflow settings click the "Allow this workflow to be manually started" and leave other checkboxes unchecked.

2) Publish the workflow, then go to the list to which this workflow is associated, select any item and then from the item menu select workflows. This will lead you to the workflows form attached with this list.


3) Click on your workflow that you created earliar to update item and this will redirect you the workflow start form.


4) Copy the url of this form from the address bar. This would be like
yoursite/_layouts/IniWrkflIP.aspx?List={9a6f5d9b-f075-43a3-a940-dafd1191477b}&ID=117&TemplateID={7b6230c2-8e22-4e7d-b167-6e68bce3a22c}&Source=yoursite/yourlist/forms/allitems.aspx

This url contains List={guid of list}, ID item id list item, TemplateID={GUID of the workflow} and source={after completion of the workflow it will redirect to this url}

5) Now create a field in this list called "start workflow" of type hyperlink. We will use this field to trigger the workflow.

6) Create another list workflow on this list called "populate start workflow link". Check the "Start workflow automatically when an item is created" in the properties window of this workflow

a) In step 1 of the workflow, create a variable named link of string type and set its value to the url of the workflow start form we copied in the step 4 as described in the following image.After the url put a comma',' and put a white space and then put a word you want to display in list otherwise it will show whole url. In this example i have used the "Publish". See image below


b) Now create another action "Update List Item". In the Item select current item and the set the field "start workflow" to this varibale as described in the below image. I have used the "Publish" field in this example.


c) Now save and publish the workflow. Whenever new item will be created a link will be created in the list and that link will redirect you to the satrt workflow form.


This is an effective and easy way for the end users to start workflow from the hyperlink field in the list


Thursday, May 3, 2012

Bulk Delete List Items


How to delete multiple Items from a SharePoint List

There are scenarios where you want to delete multiple list items at once. Insetad of using delete method of SPListItem you can use the following code that deletes multiple list items that uses batch process.

  void DeleteBulkItems(SPWeb web,SPList list, String Ids)
        {
            StringBuilder sbDelete = new StringBuilder();

            sbDelete.Append("<?xml version=\"1.0\" encoding=\"UTF-8\"?><Batch>");

            string command = "<Method><SetList Scope=\"Request\">" + list.ID + "</SetList><SetVar Name=\"ID\">{0}</SetVar><SetVar     Name=\"Cmd\">Delete</SetVar></Method>";

            string[] _DeletedIDs = Ids.Split(',');

            foreach (String item in _DeletedIDs)
            {
                sbDelete.Append(string.Format(command, item.ToString()));
            }

            sbDelete.Append("</Batch>");

           web.ProcessBatchData(sbDelete.ToString());
        }

In this method 3 parametrs are there SPWeb, SPList(List name from where you want to delete items) and Ids (List item ids to be deleted).

In above code snippet you can see that i am using a xml batch with command delete to delete list items with the specified List Item ids.

Here is the code snippet from where above function is called ;

SPweb web =SPContext.Current.Web;
SPList list=web.Lists["your list title"];
  SPListItemCollection _coll =  list.Items
  string IDs = string.Empty;
            if (_coll.Count > 0)
            {

                foreach (SPListItem item in _coll)
                {
                    IDs = IDs + string.Format("{0},", item.ID);
}
 

    }


  IDs = IDs.TrimEnd(',');
                DeleteBulkItems(web, list, IDs);

In above code i have used a string variable and that stores the ids of list items separetd by comma and in the end called the "DeleteBulkItems" function with the parameterts and the ids of the items to be deleted.

This is an eaxample of  batch process that deletes the list items.

Thursday, April 26, 2012

SharePoint Modal Dialog


How to use SharePoint Modal Dialog i.e. SPModalDialog

Here are some of the common functions related with this

To open a dialog use the below function in javascript on the html part of the page

function NewItemDialog(url, title) {
        var options = {
            url: url,
            width: 900,
            height: 700,
            title: title,
            dialogReturnValueCallback: DialogCallback
        };
        SP.UI.ModalDialog.showModalDialog(options);
    }

Here options are used to set the properties of the dialog. Some more properties are  showClose, allowmaximize etc.

Most imaportant thing is the "dialogReturnValueCallback" this property is used to get the dialog return value when the dialog is closed.

I called this function from code behind and setting the url and title described below:

string url = SPContext.Current.Web.Url + "/SitePages/NewForm.aspx?PID=" + tocid; lnknewitem.NavigateUrl = "javascript: NewItemDialog('" + url + "','New Item');";

IN above code snippet i used a link button and set its navigate url programmatically and called the Dialog open function.

And the DialogCallback function is


 function DialogCallback(dialogResult, returnValue) {

     
          if (returnValue == "1") {
            var meesageId = SP.UI.Notify.addNotification("Loading", false);
            SP.UI.ModalDialog.RefreshPage(SP.UI.DialogResult.OK);
        }

     
    }

If you want to return value from the modal dialog while closing then use the below function on the modal dialog close function


SP.UI.ModalDialog.commonModalDialogClose(dialogResult, returnVal);

ie.

SP.UI.ModalDialog.commonModalDialogClose(1, "1");

Now when dialogcallback function will fire it will check the return value if it is "1" then it will add notification and refresh the parent page.

you can pass dialogResult, returnVal according to your choice and you can get these values on the parent form using DialogCallback function as described above


To simply close the dialog use the below function on client click event of the button

function CloseForm() {

        window.frameElement.cancelPopUp();

        return false;

    }


If you want to open the new custom page in modal dialog and ribbon is displayed on the modal dialog then use this css trick to hide ribbon

 #s4-ribbonrow
    {
        display: none;
    }


Tuesday, April 10, 2012

A Sandbox Solution,what is and what is not

We all know the limitations of a sandbox solution in SharePoint. A sandbox solution is deployed to a particular site collection's solution gallery rather than to farms's solution gallery as in case of Farm solution. There are also some more limitation in the sandbox solution.

Here I am going to list some of major  limitations:-

1) You can not use any SharePoint control in sandbox solution.e.g spgrid, sharepoint datetime control, people picker etc. You have to rely on the asp.net controls.

2) You do not have access to the layouts folder.

3) You can not use Visual web parts in this rather you can use Visual Studio 2010 SharePoint Power Tools to use visual web parts in sandbox solution.

3) You can not use run with elevated privileges function to override current user's privileges.

4) You can use asp.net file upload control to upload files to SharePoint document library rather you can use silver light client context to upload files.

5) To debug the code you have to attach to the process SPUCWoker process and not to the w3p process as in farm solution.

6) You cannot use SPUtility.SendEmail method to send emails in sandbox solutions

To send email you can follow this useful link

There is SharePoint User Code service that is responsible for the sandbox solution executions.
A sandboxed solution is also not allowed to access anything outside the site collection to which it is deployed. An implication of this is that Features deployed in sandboxed solutions can only be scoped to a site collection or website

Sunday, March 11, 2012

How to Back Up While the Web Application Is Still Running


There are three steps to backing up a SharePoint Foundation site collection that is up and running. First, create a snapshot of a content database. Second, create an unattached database object out of the snapshot. Third, use the unattached database as the source of the backup instead of the live content database.


To back up all of the content databases in a Web application, your code can iterate through the SPWebApplication..::..ContentDatabases property and run the three-step process on all the content databases. In addition, of course, you can iterate through all the Web applications of the server farm to back up all the content databases in the server farm without making the Web applications read-only.


To Backup a Site Collection

  1. Get a reference to a content database.
  2. Call the CreateSnapshot() method of the content database's Snapshots collection.
  3. Pass the snapshot's ConnectionString property to the static CreateUnattachedContentDatabase(SqlConnectionStringBuilder) method.
  4. Call Backup(String, String, Boolean) and pass it the URL of a particular site collection.

    In the following example, the current site collection is the one that is backed up, but the URL of any other site collection in the same content database could have been passed to the Backup(String, String, Boolean) method.


    SPSite siteCol = SPContext.Current.Site;
    SPContentDatabase cDB = siteCol.ContentDatabase;
    
    SPDatabaseSnapshot snap = cDB.Snapshots.CreateSnapshot();
    
    SPContentDatabase unDB = SPContentDatabase.CreateUnattachedContentDatabase(snap.ConnectionString);
    
    unDB.Sites.Backup(siteCol.ServerRelativeUrl.Trim('/'), "\\Server\Backups\MySite.bak", true);


Monday, March 5, 2012

Deploy Silverlight Web Part in SharePoint 2010

Let see how to use Silverlight web part in SharePoint.

Please install Silverlight sdk if its not installed before you proceed.

First create an Empty SharePoint Project in visual studio.

Add new Project in this solution. Select "Silverlight Application" from the project templates and uncheck the "Host the Silverlight application in a new Web site".

Open the "MainPage.xaml" file and drag a data grid on to this. Set Autogenerate columns property of the grid to false

Create the columns you want to show in the grid like below:

<sdk:DataGridTextColumn  Binding="{Binding ID}" Header="ID"></sdk:DataGridTextColumn>
                        <sdk:DataGridTextColumn  Binding="{Binding Title}"

Header="Title"></sdk:DataGridTextColumn>


Open the code file of MainPage and create a class. This class will be used to set

columns in the grid.

 public class ListDataItems
        {
            public int ID { get; set; }
            public string Title { get; set; }
}

On the grid i have used "{Binding ID}" and "{Binding Title}" for the columns.

The columns of grid you will specify, that should also be in the proprery of the class as specifed in above class.


Next create a Observable collection of the above class as below:

 ObservableCollection<ListDataItems> _items ,namespace is

using System.Collections.ObjectModel;

Create ListItemCollection instance like ListItemCollection _genericList

create a method to get list items from list using Silvelight client context.private

void GetItems()
        {
            var clientContext = ClientContext.Current;
            var oList = clientContext.Web.Lists.GetByTitle("LookupList");
            var camlQuery = CamlQuery.CreateAllItemsQuery();
            _genericList = oList.GetItems(camlQuery); ;
         
            clientContext.Load(_genericList);
         
            clientContext.ExecuteQueryAsync(Pass, fail);
        }

public void Pass(object sender, ClientRequestSucceededEventArgs args)
        {


            Dispatcher.BeginInvoke(() => loaddata());


        }


 public void fail(object sender, ClientRequestFailedEventArgs args)
        {
//caught exception here if any occurs

        }

 void loaddata()
        {

            foreach (var Listitem in _genericList)
            {

                _items.Add(new ListDataItems()
                {
                    ID = Convert.ToInt32(Listitem["ID"]),
                    Title = Convert.ToString(Listitem["Title"]),
                 
                 
                });
            }
        }

Call Method on page load

 public MainPage()
        {
            InitializeComponent();
            _items = new ObservableCollection<ListDataItems>();


            yourgridid.ItemsSource = _items;

                     
            GetItems();

        }

No with all the above code you data grid containing list data is ready. Silverlight

creates a xap file that contains all your userinterface and code into one file afetr

successfulling building the project. Next step is to deploy this Silverlight

component(.xap) to SharePoint.

In the empty SharePoint project created earliar, add new item, select Module from the

templates give a name e.g.ListViewSilverlight.

Right click on the newly created module, select properties, select Project Output

Reference, click on the browse button, on the left hand side from the Members select

your Silverlight project, on the right hand side selcet Deployment Type as Element

File and click ok.

In the elements.xml file specify where you want to deploy this file in SharePoint

 <Module Name="ListViewSilverlight" Url="Style Library">
 
    <File Path="ListViewSilverlight\ListViewSilverlightWebPart.xap"

Url="SilverLightModule/ListViewSilverlightWebPart.xap"  Type="GhostableInLibrary"/>
  </Module>

Now build and deploy the Project.

Create any web part page. Select Silverlight web part from the available web parts

speciy the path of your .xap file from style library and click ok.

You will see the grid containig list data is appreared on the screen.


Monday, February 20, 2012

Deploy Master Page Programmatically


You can deploy a custom master page using visual studio.

Create your custom master page and custom css in SharePoint designer before proceeding this.

Open visual studio and select "Empty SharePoint Project" as project template.

Right click on the Project and choose add new item and select Module as new item, name it as "CustomMaster"

You will see a text file named "Sample.txt" has been created under this newly created module.

Now copy all html code from your master page and paste it in this text file and rename it with an extension ".master". This will be your master page

Now add again a new Module and name it as "CustomCss"

Again copy all your css code to the text file and rename it with an extension ".css". This will be your css file for the master page.

Open master page code under the Module and replace your css registration under <head> like this

"<SharePoint:CssRegistration name="<% $SPUrl:~sitecollection/Style Library/CustomCSS/yourfilename.css %>" After="corev4.css" runat="server"/>"

OPen the "Element.xml" under "CustomMaster" module and it should look like below

<Module Name="CustomMaster" Url="_catalogs/masterpage">
  <File Path="CustomMaster\custommaster.master" Url="custommaster.master" Type="GhostableInLibrary" />

"Url="_catalogs/masterpage"" means this will be deployed to the master page library in SharePoint.


Open the "Element.xml" under "CustomCss" module and it should look like below

<Module Name="CustomCSS" Url="Style Library">

<File Path="CustomCSS\DAVCSS.css"  Url="CustomCSS/yourfile.css"  Type="GhostableInLibrary" />

"Url="Style Library"" means this will be deployed to the style library in SharePoint.

and "<File Path="CustomCSS\DAVCSS.css"  Url="CustomCSS/yourfile.css"  Type="GhostableInLibrary"/>" means this file will be deployed to "CustomCSS" folder under style library

Remeber we have already registered our css file in the master page under head tag with the above specified location

Now add the following code in the feature receiver class file that contains above modules. Right click on the feature and click "Add Event Receiver"

  public override void featureactivated(spfeaturereceiverproperties properties)
     {

         spsite currsite = (spsite)properties.feature.parent;
         spweb curweb = currsite.rootweb;
         uri masteruri = new uri(curweb.url + "/_catalogs/masterpage/custommaster.master");

         curweb.masterurl = masteruri.absolutepath;
         curweb.custommasterurl = masteruri.absolutepath;
         curweb.update();
     }


     This will apply the master page on activation of the feature.

     public override void featuredeactivating(spfeaturereceiverproperties properties)
     {
         spsite currsite = (spsite)properties.feature.parent;
         spweb curweb = currsite.rootweb;
         uri masteruri = new uri(curweb.url + "/_catalogs/masterpage/v4.master");

         curweb.masterurl = masteruri.absolutepath;
         curweb.custommasterurl = masteruri.absolutepath;
         curweb.update();
     }
This will apply the default master page when feature will be deactivated.

Make sure your feature is scoped at site level before deploying.

Now build and deploy your solution


Saturday, February 11, 2012

Creating a Preview Pane in a List View

What is Preview Pane?

Using Preview Pane you can see a List Item details on the same page. When you will move your mouse cursor on a List Item it will show you the details of that Item.

Let see how to use Preview Pane.

1) Open the List on which you want to use Preview Pane. Select "Modify View" from the List tools


2) Under the "Style" select "Preview Pane" and press OK.


You will see that your view has been changed.

Now move your mouse cursor to any item and that item's detail will be shown on the right side in the preview pane.


Friday, February 10, 2012

Create SharePoint List from Excel

You can create a SharePoint List from excel spreadsheet.

Let see how:

1) Create a spreadsheet in excel and specify column headers and put some data.

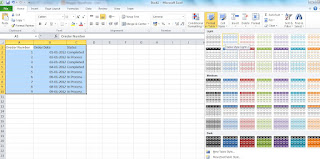
2) Select the data and on the toolbar select format as Table and choose any style like below


3) This will format your data like a table. Now select "Export Table to SharePoint List" under
the "Export" menu on the toolbar.


specify the location of your SharePoint Site, Name and Description(optional) for the List that will
be created from this data.

4) After specifying above information a pop up message will appear confirming that your list has
been created. List will be created having a datasheet view as a default view.